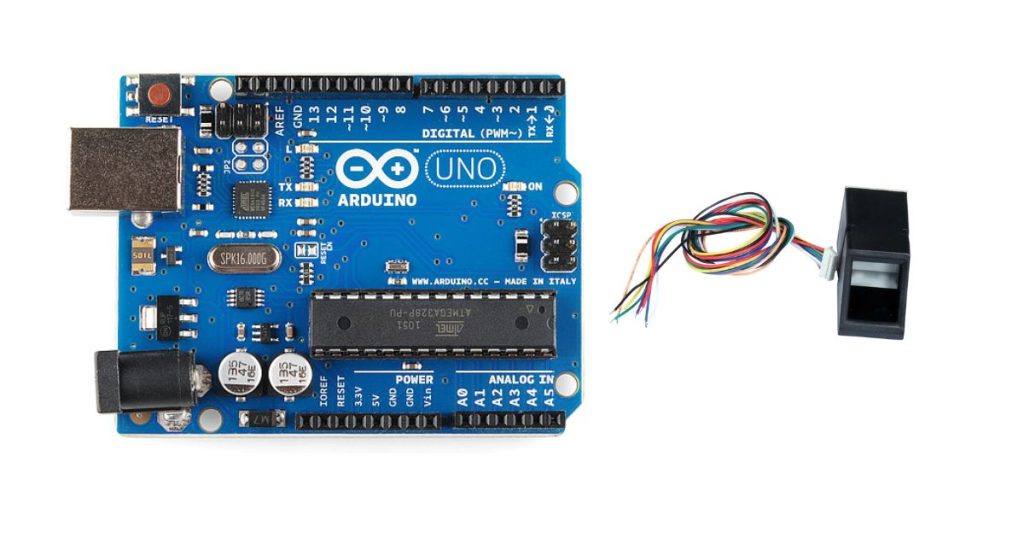
This blog post will guide you through interfacing the AS608 optical fingerprint sensor module with an Arduino. This module provides a secure and reliable way to scan and identify fingerprints for various applications.
Features of the AS608 Optical Fingerprint Sensor
The AS608 fingerprint reader sensor is a compact and efficient module used for fingerprint scanning. It can send processed data to a microcontroller like Arduino or PIC via serial communication. It can store up to 127 unique fingerprints or 162 fingerprint templates. Here’s a breakdown of its key features:
- Supply voltage: 3.3V or 3.6V
- Maximum current supply: 60mA
- Resolution: 500dpi
- Maximum fingerprint imaging time: 1s or less than 1 second
Pinout of the AS608 Optical Fingerprint Sensor
This module utilizes 4 essential pins for communication and power:
- V+: 3.3V power supply (Red wire)
- GND: Ground (Green wire)
- TX: Serial Transmitter (Orange wire)
- RX: Serial Receiver (Brown wire)
Required Materials
Hardware
Software
- Arduino IDE
- Adafruit Fingerprint Library
Connecting the AS608 Sensor to Arduino
Step 1: Connect the AS608 sensor to the Arduino board using the following connections:
| AS608 Sensor Pin | Arduino Pin |
|---|---|
| V+ | 3.3V |
| GND | GND |
| TX | Digital Pin 2 |
| RX | Digital Pin 3 |
Step 2: Install the Adafruit Fingerprint Library.
You can find this library in the Arduino IDE Library Manager by searching “Fingerprint”.
Enrolling a Fingerprint
Step 3: Upload the following code to your Arduino board to enrol a fingerprint:
/* AS608-Optical-Fingerprint-Sensor-enroll
Home based on Adafruit Library */
#include <Adafruit_Fingerprint.h>
SoftwareSerial mySerial(2, 3); // TX/RX

Adafruit_Fingerprint finger = Adafruit_Fingerprint(&mySerial);
uint8_t id;

void setup() {
  Serial.begin(9600);
  while (!Serial);  // For Yun/Leo/Micro/Zero/...
  delay(100);
  Serial.println("\n\nAdafruit Fingerprint sensor enrollment");

  // set the data rate for the sensor serial port
  finger.begin(57600);
  if (finger.verifyPassword()) {
    Serial.println("Found fingerprint sensor!");
  } else {
    Serial.println("Did not find fingerprint sensor :(");
    while (1) {
      delay(1);
    }
  }
}

uint8_t readnumber(void) {
  uint8_t num = 0;
  while (num == 0) {
    while (! Serial.available());
    num = Serial.parseInt();
  }
  return num;
}

void loop() // run over and over again
{
  Serial.println("Ready to enroll a fingerprint!");
  Serial.println("Please type in the ID # (from 1 to 127) you want to save this finger as...");
  id = readnumber();
  if (id == 0) {// ID #0 not allowed, try again!
    return;
  }
  Serial.print("Enrolling ID #");
  Serial.println(id);

  while (! getFingerprintEnroll() );
}

uint8_t getFingerprintEnroll() {
  int p = -1;
  Serial.print("Waiting for valid finger to enroll as #");
  Serial.println(id);
  while (p != FINGERPRINT_OK) {
    p = finger.getImage();
    switch (p) {
    case FINGERPRINT_OK:
      Serial.println("Image taken");
      break;
    case FINGERPRINT_NOFINGER:
      break;
    case FINGERPRINT_PACKETRECIEVEERR:
      Serial.println("Communication error");
      break;
    case FINGERPRINT_IMAGEFAIL:
      Serial.println("Imaging error");
      break;
    default:
      Serial.println("Unknown error");
      break;
    }
  }

  // OK success!
  p = finger.image2Tz(1);
  switch (p) {
    case FINGERPRINT_OK:
      Serial.println("Image converted");
      break;
    case FINGERPRINT_IMAGEMESS:
      Serial.println("Image too messy");
      return p;
    case FINGERPRINT_PACKETRECIEVEERR:
      Serial.println("Communication error");
      return p;
    case FINGERPRINT_FEATUREFAIL:
      Serial.println("Could not find fingerprint features");
      return p;
    case FINGERPRINT_INVALIDIMAGE:
      Serial.println("Could not find fingerprint features");
      return p;
    default:
      Serial.println("Unknown error");
      return p;
  }

  Serial.println("Remove finger");
  delay(2000);
  p = 0;
  while (p != FINGERPRINT_NOFINGER) {
    p = finger.getImage();
  }
  Serial.print("ID "); Serial.println(id);
  p = -1;
  Serial.println("Place same finger again");
  while (p != FINGERPRINT_OK) {
    p = finger.getImage();
    switch (p) {
    case FINGERPRINT_OK:
      Serial.println("Image taken");
      break;
    case FINGERPRINT_NOFINGER:
      break;
    case FINGERPRINT_PACKETRECIEVEERR:
      Serial.println("Communication error");
      break;
    case FINGERPRINT_IMAGEFAIL:
      Serial.println("Imaging error");
      break;
    default:
      Serial.println("Unknown error");
      break;
    }
  }

  // OK success!
  p = finger.image2Tz(2);
  switch (p) {
    case FINGERPRINT_OK:
      Serial.println("Image converted");
      break;
    case FINGERPRINT_IMAGEMESS:
      Serial.println("Image too messy");
      return p;
    case FINGERPRINT_PACKETRECIEVEERR:
      Serial.println("Communication error");
      return p;
    case FINGERPRINT_FEATUREFAIL:
      Serial.println("Could not find fingerprint features");
      return p;
    case FINGERPRINT_INVALIDIMAGE:
      Serial.println("Could not find fingerprint features");
      return p;
    default:
      Serial.println("Unknown error");
      return p;
  }

  // OK converted!
  Serial.print("Creating model for #");  Serial.println(id);
  p = finger.createModel();
  if (p == FINGERPRINT_OK) {
    Serial.println("Prints matched!");
  } else if (p == FINGERPRINT_PACKETRECIEVEERR) {
    Serial.println("Communication error");
    return p;
  } else if (p == FINGERPRINT_ENROLLMISMATCH) {
    Serial.println("Fingerprints did not match");
    return p;
  } else {
    Serial.println("Unknown error");
    return p;
  }

  Serial.print("ID "); Serial.println(id);
  p = finger.storeModel(id);
  if (p == FINGERPRINT_OK) {
    Serial.println("Stored!");
  } else if (p == FINGERPRINT_PACKETRECIEVEERR) {
    Serial.println("Communication error");
    return p;
  } else if (p == FINGERPRINT_BADLOCATION) {
    Serial.println("Could not store in that location");
    return p;
  } else if (p == FINGERPRINT_FLASHERR) {
    Serial.println("Error writing to flash");
    return p;
  } else {
    Serial.println("Unknown error");
    return p;
  }
  return true;
}
Step 4: Open the Serial Monitor and follow the instructions to enrol a fingerprint. When prompted, enter a unique ID (1 to 127) and follow the steps to scan your finger twice.
Verifying a Fingerprint
Step 5: Upload the following code to your Arduino to verify a fingerprint:
/* AS608-Optical-Fingerprint-Sensor-enroll
Modified on 06 Jan 2021 by Amir Mohammad Shojaee @ Electropeak
Home based on Adafruit Library */
#include <Adafruit_Fingerprint.h>
volatile int finger_status = -1;
SoftwareSerial mySerial(2, 3); // TX/RX on fingerprint sensor
Adafruit_Fingerprint finger = Adafruit_Fingerprint(&mySerial);

void setup() {
  Serial.begin(9600);
  while (!Serial); // For Yun/Leo/Micro/Zero/...
  delay(100);
  Serial.println("\n\nAdafruit finger detect test");

  // set the data rate for the sensor serial port
  finger.begin(57600);
  if (finger.verifyPassword()) {
    Serial.println("Found fingerprint sensor!");
  } else {
    Serial.println("Did not find fingerprint sensor :(");
    while (1) {
      delay(1);
    }
  }

  finger.getTemplateCount();
  Serial.print("Sensor contains "); Serial.print(finger.templateCount);
  Serial.println(" templates");
  Serial.println("Waiting for valid finger...");
}

void loop() // run over and over again
{
  finger_status = getFingerprintIDez();
  if (finger_status!=-1 and finger_status!=-2){
    Serial.print("Match");
  } else{
    if (finger_status==-2){
      for (int ii=0;ii<5;ii++){
        Serial.print("Not Match");
      }
    }
  }
  delay(50); //don't need to run this at full speed.
}

// returns -1 if failed, otherwise returns ID #
int getFingerprintIDez() {
  uint8_t p = finger.getImage();
  if (p!=2){
    Serial.println(p);
  }
  if (p != FINGERPRINT_OK)  return -1;

  p = finger.image2Tz();
  if (p!=2){
    Serial.println(p);
  }
  if (p != FINGERPRINT_OK)  return -1;

  p = finger.fingerFastSearch();
  if (p != FINGERPRINT_OK)  return -2;

  // found a match!
  Serial.print("Found ID #"); Serial.print(finger.fingerID);
  Serial.print(" with confidence of "); Serial.println(finger.confidence);
  return finger.fingerID;
}
Step 6: Open the Serial Monitor and touch the sensor. The code will compare the scanned fingerprint with the enrolled fingerprints and indicate whether it’s a match.
Applications
The AS608 Optical Fingerprint Sensor module is highly versatile, enabling you to incorporate fingerprint authentication into various projects. Here are some potential applications:
- Restrict access to specific areas or devices based on fingerprint authentication.
- Implement accurate and efficient employee time tracking.
- Create personalized gadgets with fingerprint-based user profiles.
- Enhance security for applications requiring high-level authentication.
- Secure valuables with fingerprint-controlled access.
- Integrate fingerprint authentication into your IoT devices for added security.
Conclusion
This guide equips you with the knowledge and tools to integrate the AS608 Optical Fingerprint Sensor module with your Arduino projects. The provided code examples and step-by-step instructions will help you enrol and verify fingerprints, enabling you to implement secure and reliable fingerprint authentication. Explore the various applications and leverage this powerful sensor to enhance security, personalization, and user experience in your projects.


