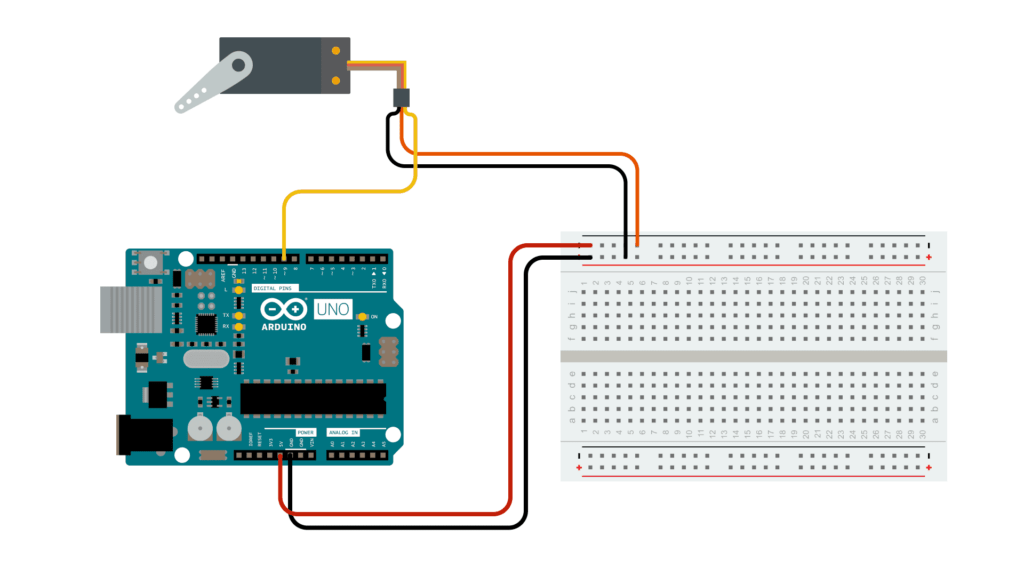
In this tutorial, you will learn how to control a servo motor using an Arduino board. Arduino servo motors are a popular choice for hobbyists and makers who want to create precise motion control systems. Servo motors can be used to control a wide variety of devices, such as robotic arms, animatronics, and even model aeroplanes.
Step 1:
Gather Materials to be used in Controlling the Servo Motor using Arduino
To get started, you will need the following materials:
- Arduino board (e.g. Arduino Uno)
- Servo motor
- Breadboard (Breadboard 840 Tie-Points)
- Jumper wires (Male-to-Male Jumper)

Step 2:
Connect Components
Connect the servo motor to the breadboard and the Arduino board as follows:
- Connect the servo’s GND pin to the breadboard’s GND rail
- Connect the servo’s VCC pin to the breadboard’s +5V rail
- Connect the servo’s signal pin to Arduino pin 9
Step 3:
Write the Code
Write the Code Open the Arduino IDE and write the following code:
#include <Servo.h>

Servo myservo;

void setup() {
  myservo.attach(9);
}

void loop() {
  myservo.write(90); // Move the servo to 90 degrees
  delay(1000); // Wait for 1 second
  myservo.write(180); // Move the servo to 180 degrees
  delay(1000); // Wait for 1 second
}
Arduino Servo Motor Code Walkthrough
This code initializes the servo motor and attaches it to pin 9 on the Arduino board. It then sets the motor angle to 90 degrees and waits for one second, before setting the angle to 180 degrees and waiting for another second. You can modify the code to set the angle to any value between 0 and 180 degrees. Let us explain the code in detail.
#include <Servo.h>This line includes the Servo library, which is required for controlling servo motors using Arduino.
Servo myservo;myservo.void setup() {
myservo.attach(9);
}The setup() function is called once when the Arduino board is powered on. This function attaches the servo motor to pin 9 on the Arduino board.
void loop() {
    myservo.write(90);
    delay(1000);
    myservo.write(180);
    delay(1000);
}
The loop() function is called repeatedly after the setup() function has finished running. This function sets the servo motor angle to 90 degrees and then waits for 1 second. Next, it sets the servo motor angle to 180 degrees and waits for 1 second. This process repeats continuously, causing the servo motor to move back and forth between 90 and 180 degrees.
You can modify the code to change the angle at which the servo motor moves and the amount of time that it waits between each step. For example, you could change the code to set the servo motor angle to 0 degrees and then wait for 2 seconds, before setting the angle to 180 degrees and waiting for another 2 seconds. This would cause the servo motor to move more slowly and smoothly.
You can also use the Servo library to control multiple servo motors simultaneously. To do this, you would create a new servo object for each motor and then attach it to a different pin on the Arduino board. You could then use the myservo.write() function to set the angle of each motor individually.
Step 4:
Upload the Code
Connect the Arduino board to your computer using a USB cable and upload the code to the board.
Step 5:
Test the Motor
With the code uploaded, the servo motor should begin moving between 90 and 180 degrees, pausing for one second at each position.
Tips for using servo motors with Arduino
Some tips on how to use servo motors with Arduino:
Servo motors have a limited torque, so make sure not to overload them.
If you are using a powerful servo motor, you may need to use a separate power supply for the servo motor.
Servo motors can be used to control a wide variety of devices, but they are best suited for applications where precise motion control is required.
Conclusion
Congratulations, you now know how to control a servo motor with your Arduino board! From here, you can experiment with different angles and timings to create your own custom motion control systems.
