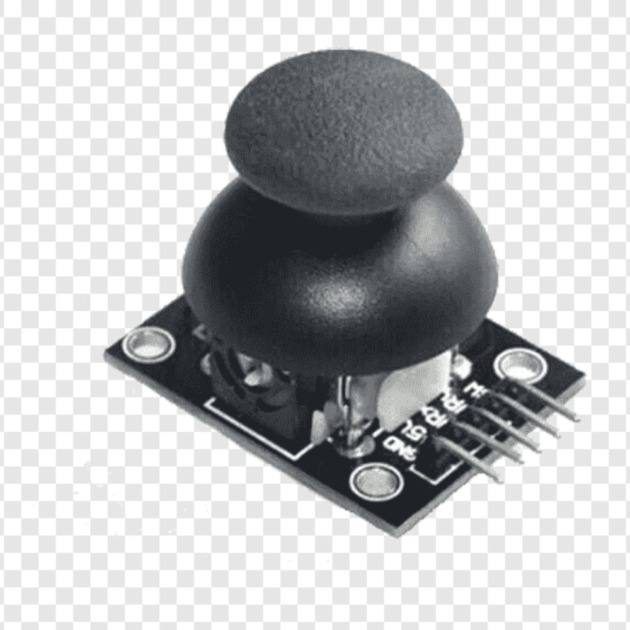
Arduino Joystick Module
The Arduino Joystick Module is an essential component for DIY electronics enthusiasts and game developers. This module allows for precise control in various applications, including gaming and robotics, making it an ideal choice for creating custom game controllers and interactive projects.
Key Features
- Dual-axis analogue joystick control
- Integrated push-button functionality
- Compatible with Arduino and other microcontrollers
- 5V operating voltage for easy integration
- Compact design for space-efficient projects
- High precision and responsiveness
Technical Specifications
- Operating Voltage: 5V DC
- Current Draw: Typically <10mA
- X and Y Axis Range: 0-1023 (10-bit ADC resolution)
- Button Type: Momentary push-button
- Communication: Analog
- Dimensions: Approximately 40mm x 28mm x 30mm (L x W x H)
- Weight: Approximately 10g
Applications:
- DIY game controllers for retro gaming consoles
- Robot control systems for movement and navigation
- Computer input devices for accessibility solutions
- Interactive art installations
- Custom drone or RC vehicle controls
Pinout Diagram:
 +------------------------+
  |       Joystick        |
  |   1. VCC (5V)         |
  |   2. GND              |
  |   3. X-axis Output    |
  |   4. Y-axis Output    |
  |   5. Button Output    |
  +-----------------------+
Pin Configuration
- GND: Ground
- +5V: Power supply
- VRx: Voltage proportional to X-axis position
- VRy: Voltage proportional to Y-axis position
- SW: Switch output (digital)
Setup Instructions:
Connection:
- Connect VCC to 5V on your Arduino
- Connect GND to GND on your Arduino
- Connect VRx to an analog pin (e.g., A0)
- Connect VRy to another analogue pin (e.g., A1)
- Connect SW to a digital pin (e.g., D2)
Code:
const int VRx = A0;
const int VRy = A1;
const int SW = 2;

void setup() {
  Serial.begin(9600);
  pinMode(SW, INPUT_PULLUP);
}

void loop() {
  int xValue = analogRead(VRx);
  int yValue = analogRead(VRy);
  int buttonState = digitalRead(SW);

  Serial.print("X: ");
  Serial.print(xValue);
  Serial.print(" | Y: ");
  Serial.print(yValue);
  Serial.print(" | Button: ");
  Serial.println(buttonState);

  delay(100);
}
Operation:
- Upload the code to your Arduino board
- Open the Serial Monitor (9600 baud)
- Move the joystick to see X and Y values change
- Press the joystick button to see the button state change
Caution:
- Do not exceed 5V input voltage to avoid damaging the module
- Handle the joystick gently to prevent mechanical damage
- Ensure proper grounding to avoid erratic behaviour
Troubleshooting Tips:
- Erratic readings: Check wiring connections and ensure proper grounding
- No response: Verify power supply and check for correct pin assignments
- Inverted axis: Adjust the code to reverse the axis readings if necessary
- Button not working: Ensure the SW pin is properly connected and INPUT_PULLUP is used
- Noisy readings: Add a small capacitor (0.1μF) between VCC and GND for filtering
FAQs:
- Q: Can I use this module with 3.3V systems? A: It’s designed for 5V but may work with 3.3V systems. Use a level shifter for best results.
- Q: How do I calibrate the joystick? A: Read min/max values for each axis and map them in your code to desired output ranges.
- Q: Can I use multiple modules with one Arduino? A: Yes, connect each module to different analogue and digital pins.
- Q: What’s the lifespan of the joystick? A: With proper use, it can last for hundreds of thousands of cycles.
- Q: Is this module suitable for precision control applications? A: While quite accurate, for high-precision applications, consider using modules with higher resolution.
Resources:
- Arduino Joystick Library: https://github.com/MHeironimus/ArduinoJoystickLibrary
- Adafruit Learn Guide on Joysticks: https://learn.adafruit.com/analog-joystick
- Arduino Forum – Joystick Projects: https://forum.arduino.cc/c/projects/7
- SparkFun Tutorial on Joysticks: https://learn.sparkfun.com/tutorials/joystick-shield-hookup-guide
- Instructables – Arduino Joystick Projects: https://www.instructables.com/circuits/arduino/joystick/projects/



Reviews
There are no reviews yet.