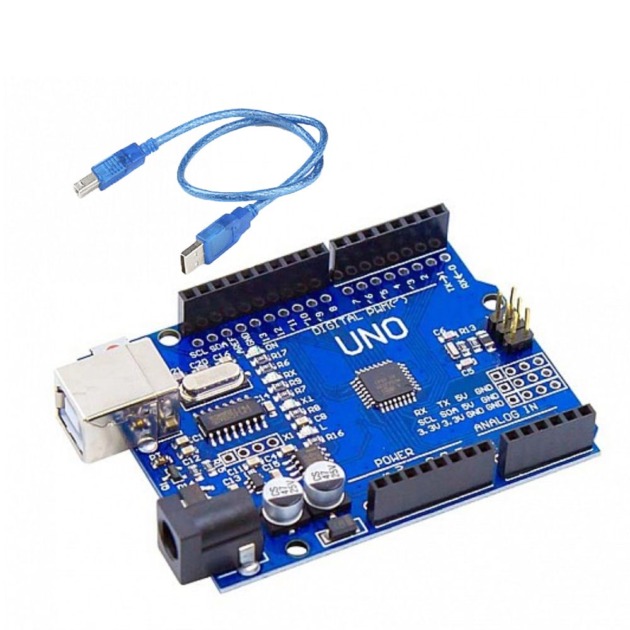
Arduino UNO R3 SMD with USB Cable – Perfect for Electronics Projects
The Arduino UNO R3 SMD is a compact and powerful development board based on the ATmega328P microcontroller, designed for both beginners and experienced enthusiasts in electronics. With its robust features and user-friendly interface, this board is perfect for creating a wide range of projects, from simple LED displays to complex robotics.
The SMD version of the Arduino UNO R3 offers the same functionality as the traditional UNO R3 but features a streamlined design compared to the DIP package, making it ideal for space-constrained applications. Users can easily program the board using the Arduino IDE, which supports a vast library of pre-written code, ensuring a smooth development experience. Whether you’re aiming to build a home automation system or a DIY gadget, the Arduino UNO R3 SMD is ideal for both beginners and professionals. This board is widely used for various projects, from simple electronics experiments to advanced robotics, prototyping, and more complex DIY electronics.
Key Features:
- Microcontroller: ATmega328P in SMD package
- EEPROM: 1 KB (ATmega328P)
- Reset Button: For easy reset of the microcontroller
- Clock Speed: 16 MHz
- Input Voltage (recommended): 7-12V
- SRAM: 2 KB (ATmega328P)
- Digital I/O Pins: 14 (of which 6 provide PWM output)
- USB Connection: Standard USB-B for programming and communication
- Operating Voltage: 5V
- Power Jack: 2.1mm center-positive barrel jack
- Analog Input Pins: 6
- Flash Memory: 32 KB (ATmega328P, of which 0.5 KB is used by the bootloader)
- ICSP Header: For in-circuit programming
Technical Specifications:
- Microcontroller: ATmega328P (SMD)
- Operating Voltage: 5V
- Input Voltage (recommended): 7-12V
- Input Voltage (limits): 6-20V
- Digital I/O Pins: 14 (6 PWM)
- Analog Input Pins: 6
- DC Current per I/O Pin: 40 mA
- DC Current for 3.3V Pin: 50 mA
- Flash Memory: 32 KB (0.5 KB used by Bootloader)
- SRAM: 2 KB
- EEPROM: 1 KB
- Clock Speed: 16 MHz
- Dimensions: 68.6 x 53.4 mm
- Weight: Approx. 25g
Applications:
- Home Automation: Control lights, appliances, or smart devices with ease.
- Robotics: Build robots for education, research, or hobbies.
- IoT Projects: Develop systems that gather and upload data to the cloud.
- STEM Education: Teach coding, electronics, and design in classrooms or workshops.
- Environmental Monitoring: Use sensors to track temperature, humidity, and more.
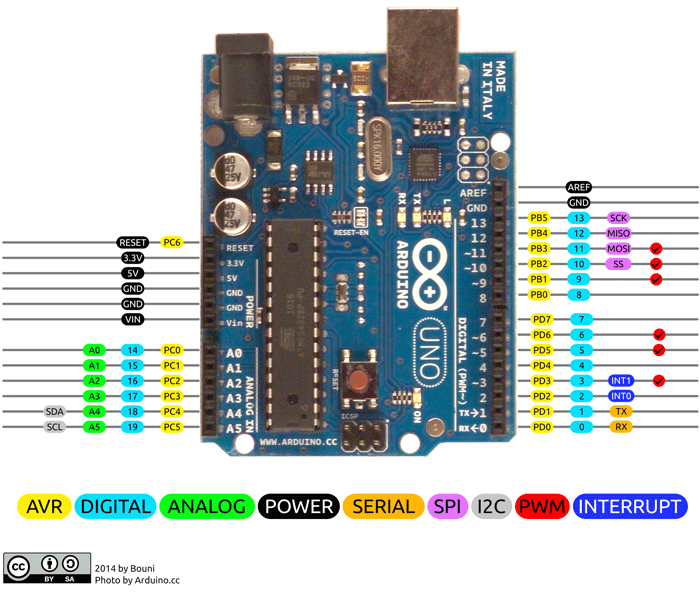
Pinout Diagram:
Use the pinout diagram below to plan your project connections efficiently. This board features 14 digital pins, including 6 with PWM capabilities, and 6 analog inputs. Use A4 (SDA) and A5 (SCL) for I2C devices.
Usage:
- Wiring: Attach sensors, actuators, and other components to the appropriate pins. Power them using the 5V and GND pins. For I2C devices, connect to A4 (SDA) and A5 (SCL).
- Programming: Install the Arduino IDE, connect the board to your computer via USB, select “Arduino UNO” as the board type, and choose the correct COM port. Start coding and click “Upload” to program your board.
Example Code to Blink LED:
void setup() {
  pinMode(13, OUTPUT);  // Set pin 13 as output
}

void loop() {
  digitalWrite(13, HIGH);  // Turn on the LED
  delay(1000);             // Wait for 1 second
  digitalWrite(13, LOW);   // Turn off the LED
  delay(1000);             // Wait for 1 second
}
Caution:
- Don’t exceed 5V on I/O pins.
- Use resistors with LEDs and other components to prevent short circuits.
- Handle the board carefully to avoid static damage.
Troubleshooting Tips:
- Board not recognized? Install or update the CH340G/FT232RL driver.
- Upload errors? Double-check board and port selection.
- Inconsistent behaviour? Ensure a stable power supply and check grounding.
- Overheating? Check for short circuits and reduce power consumption if needed.
Frequently Asked Questions:
- Can I use a 9V battery to power the board?
- Yes, a 9V battery is within the recommended input voltage range.
- How many analogue sensors can I connect at once?
- You can connect up to 6 analogue sensors using the A0-A5 pins.
- Is the Arduino UNO R3 SMD suitable for beginners?
- Definitely! Its easy-to-use design and large community support make it perfect for beginners.
- Can I use Arduino shields with this board?
- Yes, it’s fully compatible with most Arduino R3 shields.
- How do I update the firmware?
- Firmware updates are rare, but if needed, you can use an ICSP programmer or another Arduino to flash the bootloader.






Reviews
There are no reviews yet.